Flash RPICT Attiny84 with Arduino UNO: Difference between revisions
No edit summary |
|||
| (11 intermediate revisions by the same user not shown) | |||
| Line 2: | Line 2: | ||
This will guide through the steps to flash the firmware on the attiny84 microcontroller found on some RPICT series. | This will guide through the steps to flash the firmware on the attiny84 microcontroller found on some RPICT series. | ||
=Required equipment= | |||
* 1 Arduino UNO | * 1 Arduino UNO | ||
* 6 Jumper wires | * 6 Jumper wires | ||
See also [[How_to_program_an_Attiny85_or_Attiny84]]. | |||
<br>[http://lechacalshop.com/gb/various/25-ftdi-arduino-programmer-attiny-atmega.html NanoProg] is a more appropriate tool for this operation. | |||
=Connections= | |||
[[File:IMG_1839_small.png| 400px | right]] | |||
The RPICT board has a 6 pin ISP port as shown below. | |||
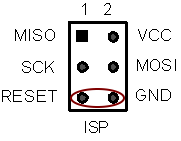
[[File:Isp_reset.png]] | [[File:Isp_reset.png]] | ||
| Line 41: | Line 48: | ||
=ISP Sketch= | =ISP Sketch= | ||
First of all we must flash a sketch in the Arduino UNO to convert it into a programmer for the RPICT card. | |||
Open the Arduino IDE and open the file | Open the Arduino IDE and open the file | ||
'''Files''' | '''Examples''' | '''ArduinoISP''' | '''Files''' | '''Examples''' | '''ArduinoISP''' | ||
Make sure that '''Tools''' | '''Board: Arduino/Genuino UNO''' is selected. | |||
Upload this sketch to the Arduino uno. | |||
=Upload the Attiny sketch= | =Upload the Attiny sketch= | ||
| Line 53: | Line 64: | ||
Then select '''Tools''' | '''Burn Bootloader''' | Then select '''Tools''' | '''Burn Bootloader''' | ||
Now select '''Sketch''' | '''Upload Using Programmer''' | |||
You must now reload the config with the lcl-rpict-config tool on the Raspberrypi. | |||
Latest revision as of 20:48, 12 May 2023
This will guide through the steps to flash the firmware on the attiny84 microcontroller found on some RPICT series.
Required equipment
- 1 Arduino UNO
- 6 Jumper wires
See also How_to_program_an_Attiny85_or_Attiny84.
NanoProg is a more appropriate tool for this operation.
Connections

The RPICT board has a 6 pin ISP port as shown below.
Connect the wires between the Arduino UNO and the RPICT board as follow:
| Arduino | RPICT |
|---|---|
| 10 | Rst |
| Gnd | Gnd |
| 13 | SCK |
| 11 | MOSI |
| 12 | MISO |
| 5V | VCC |
ISP Sketch
First of all we must flash a sketch in the Arduino UNO to convert it into a programmer for the RPICT card.
Open the Arduino IDE and open the file Files | Examples | ArduinoISP
Make sure that Tools | Board: Arduino/Genuino UNO is selected.
Upload this sketch to the Arduino uno.
Upload the Attiny sketch
Download the sketch that you wish to upload. Open it with the Arduino IDE.
Select Tools | Board: ATtiny 24/44/84
Then select Tools | Burn Bootloader
Now select Sketch | Upload Using Programmer
You must now reload the config with the lcl-rpict-config tool on the Raspberrypi.
