Repeat a Wifi Hotspot: Difference between revisions
| (36 intermediate revisions by the same user not shown) | |||
| Line 1: | Line 1: | ||
In this setup we will show how we can connect to a wifi hotspot and redistribute the signal so that several computers/phone can connect. | In this setup we will show how we can connect to a wifi hotspot and redistribute the signal so that several computers/phone can connect using the same account. This setup is proven to work really well with BTwifi and FON hotspots. This same configuration should also work for other hotspots. | ||
==How it works== | |||
The WR703N router is flashed with OpenWRT firmware. The Wifi interface will serve both the role of a client (connecting with the hotspot) and an access point where other devices can connect to. From the hotspot point of view there is only one device connected to it. The router then just bridge a small network of devices to this connection. | |||
This is a really handy setup for making a local wifi connection on the move or to keep as an emergency kit. It can also be used to extend the range of the hotspot thus becoming a hotspot repeater. | |||
==Hardware== | ==Hardware== | ||
* [http:// | * [http://lechacalshop.com/gb/various/5-wr703n-openwrt-ready-web-interface.html WR703N] | ||
We will assume the router is wired connected directly to a computer (Network cable or RJ45). Web interface accessible with http://192.168.1.1 | |||
==Software== | ==Software== | ||
| Line 12: | Line 20: | ||
==Configuration from Web Interface (Luci)== | ==Configuration from Web Interface (Luci)== | ||
{| | |||
|[[File:R_wifi_01.png | 400px | top]]||From the menu go to '''Network''' -> '''Wifi'''. | |||
[[File:R_wifi_01.png | 400px | top]] | |||
From the menu go to '''Network''' | |||
Then Hit The '''Scan''' button to find your hotspot network. | Then Hit The '''Scan''' button to find your hotspot network. | ||
|- | |||
|[[File:R_wifi_02.png | 400px | top]]||Select your network with the '''Join Network''' button. | |||
|- | |||
|[[File:R_wifi_03.png | 400px | top]]||Leave everything as default then hit '''Submit''' | |||
|- | |||
|[[File:R_wifi_04.png | 400px | top]]||Hit '''Save & Apply''' on the next page. Again leave everything as default. The wifi client interface will be created once this step complete. | |||
|- | |||
|[[File:R_wifi_01.png | 400px | top]]||Return to '''Network''' -> '''Wifi'''. Then hit the '''Add''' button to add the Access point interface. | |||
|- | |||
|[[File:R_wifi_05.png | 400px | top]]||On this page enter the Essid that you would like to use. We are using '''OpenWRT''' in this example. Make sure that '''LAN''' is ticked in the Network section. Then save it with '''Save & Apply'''. | |||
|- | |||
|[[File:R_wifi_06.png | 400px | top]]||Now navigate to '''Network''' -> '''DHCP and DNS'''. Untick '''Rebind protection''' then do '''Save & Apply'''. | |||
|- | |||
|[[File:R_wifi_07.png | left | 400px | top]]||Connect a wifi device to the network just created. '''OpenWRT''' in our case here. Connect to any website then the hotspot login page will appear. Enter your credentials and any device connecting to the [http://www.ebay.co.uk/itm/141656483595 WR703N] wifi will be connected. | |||
|} | |||
==Configuration from Command Line (ssh)== | |||
For those who are more command line oriented we provide the configuration below for the three files involved. | |||
===/etc/config/wireless=== | |||
config wifi-device 'radio0' | |||
option type 'mac80211' | |||
option hwmode '11g' | |||
option path 'platform/ar933x_wmac' | |||
option htmode 'HT20' | |||
option disabled '0' | |||
option channel '1' | |||
option txpower '30' | |||
option country 'GB' | |||
config wifi-iface | |||
option ssid 'BTWifi-with-FON' | |||
option encryption 'none' | |||
option device 'radio0' | |||
option mode 'sta' | |||
option network 'wwan' | |||
option bssid 'AB:CD:EF:01:23:45' | |||
config wifi-iface | |||
option device 'radio0' | |||
option mode 'ap' | |||
option ssid 'OpenWrt' | |||
option encryption 'none' | |||
option network 'lan' | |||
===/etc/config/network=== | |||
config interface 'loopback' | |||
option ifname 'lo' | |||
option proto 'static' | |||
option ipaddr '127.0.0.1' | |||
option netmask '255.0.0.0' | |||
config globals 'globals' | |||
option ula_prefix 'xxxx:xxxx:xxxx::/48' | |||
config interface 'lan' | |||
option ifname 'eth0' | |||
option force_link '1' | |||
option type 'bridge' | |||
option proto 'static' | |||
option ipaddr '192.168.1.1' | |||
option netmask '255.255.255.0' | |||
option ip6assign '60' | |||
config interface 'wwan' | |||
option proto 'dhcp' | |||
===/etc/config/dhcp=== | |||
config dnsmasq | |||
option domainneeded '1' | |||
option boguspriv '1' | |||
option localise_queries '1' | |||
option local '/lan/' | |||
option domain 'lan' | |||
option expandhosts '1' | |||
option authoritative '1' | |||
option readethers '1' | |||
option leasefile '/tmp/dhcp.leases' | |||
option resolvfile '/tmp/resolv.conf.auto' | |||
option rebind_protection '0' | |||
config dhcp 'lan' | |||
option interface 'lan' | |||
option start '100' | |||
option limit '150' | |||
option leasetime '12h' | |||
option dhcpv6 'server' | |||
option ra 'server' | |||
config dhcp 'wan' | |||
option interface 'wan' | |||
option ignore '1' | |||
config odhcpd 'odhcpd' | |||
option maindhcp '0' | |||
option leasefile '/tmp/hosts/odhcpd' | |||
option leasetrigger '/usr/sbin/odhcpd-update' | |||
Latest revision as of 14:52, 15 December 2017
In this setup we will show how we can connect to a wifi hotspot and redistribute the signal so that several computers/phone can connect using the same account. This setup is proven to work really well with BTwifi and FON hotspots. This same configuration should also work for other hotspots.
How it works
The WR703N router is flashed with OpenWRT firmware. The Wifi interface will serve both the role of a client (connecting with the hotspot) and an access point where other devices can connect to. From the hotspot point of view there is only one device connected to it. The router then just bridge a small network of devices to this connection.
This is a really handy setup for making a local wifi connection on the move or to keep as an emergency kit. It can also be used to extend the range of the hotspot thus becoming a hotspot repeater.
Hardware
We will assume the router is wired connected directly to a computer (Network cable or RJ45). Web interface accessible with http://192.168.1.1
Software
Documentation written for OpenWRT Barrier Breaker 14.07 from fresh install.
Configuration from Web Interface (Luci)
 |
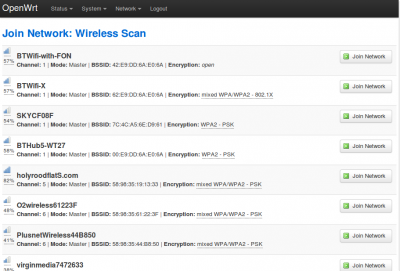
From the menu go to Network -> Wifi.
Then Hit The Scan button to find your hotspot network. |
 |
Select your network with the Join Network button. |
 |
Leave everything as default then hit Submit |
 |
Hit Save & Apply on the next page. Again leave everything as default. The wifi client interface will be created once this step complete. |
 |
Return to Network -> Wifi. Then hit the Add button to add the Access point interface. |
 |
On this page enter the Essid that you would like to use. We are using OpenWRT in this example. Make sure that LAN is ticked in the Network section. Then save it with Save & Apply. |
 |
Now navigate to Network -> DHCP and DNS. Untick Rebind protection then do Save & Apply. |
 |
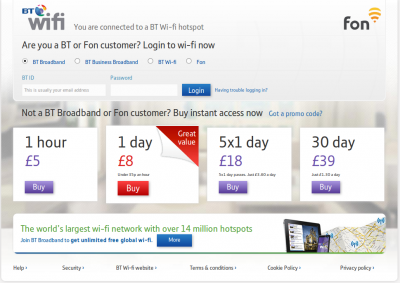
Connect a wifi device to the network just created. OpenWRT in our case here. Connect to any website then the hotspot login page will appear. Enter your credentials and any device connecting to the WR703N wifi will be connected. |
Configuration from Command Line (ssh)
For those who are more command line oriented we provide the configuration below for the three files involved.
/etc/config/wireless
config wifi-device 'radio0'
	option type 'mac80211'
	option hwmode '11g'
	option path 'platform/ar933x_wmac'
	option htmode 'HT20'
	option disabled '0'
	option channel '1'
	option txpower '30'
	option country 'GB'

config wifi-iface
	option ssid 'BTWifi-with-FON'
	option encryption 'none'
	option device 'radio0'
	option mode 'sta'
	option network 'wwan'
	option bssid 'AB:CD:EF:01:23:45'

config wifi-iface
	option device 'radio0'
	option mode 'ap'
	option ssid 'OpenWrt'
	option encryption 'none'
	option network 'lan'
/etc/config/network
config interface 'loopback'
	option ifname 'lo'
	option proto 'static'
	option ipaddr '127.0.0.1'
	option netmask '255.0.0.0'

config globals 'globals'
	option ula_prefix 'xxxx:xxxx:xxxx::/48'

config interface 'lan'
	option ifname 'eth0'
	option force_link '1'
	option type 'bridge'
	option proto 'static'
	option ipaddr '192.168.1.1'
	option netmask '255.255.255.0'
	option ip6assign '60'

config interface 'wwan'
	option proto 'dhcp'
/etc/config/dhcp
config dnsmasq
	option domainneeded '1'
	option boguspriv '1'
	option localise_queries '1'
	option local '/lan/'
	option domain 'lan'
	option expandhosts '1'
	option authoritative '1'
	option readethers '1'
	option leasefile '/tmp/dhcp.leases'
	option resolvfile '/tmp/resolv.conf.auto'
	option rebind_protection '0'

config dhcp 'lan'
	option interface 'lan'
	option start '100'
	option limit '150'
	option leasetime '12h'
	option dhcpv6 'server'
	option ra 'server'

config dhcp 'wan'
	option interface 'wan'
	option ignore '1'

config odhcpd 'odhcpd'
	option maindhcp '0'
	option leasefile '/tmp/hosts/odhcpd'
	option leasetrigger '/usr/sbin/odhcpd-update'