Flash RPICT Attiny84 with Arduino UNO: Difference between revisions
Jump to navigation
Jump to search
(Created page with " This will guide through the steps to flash the firmware on the attiny84 microcontroller found on some RPICT series. ==Required equipment== * 1 Arduino UNO * 6 Jumper wires") |
No edit summary |
||
| Line 6: | Line 6: | ||
* 1 Arduino UNO | * 1 Arduino UNO | ||
* 6 Jumper wires | * 6 Jumper wires | ||
==Connections== | |||
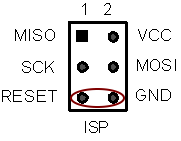
[[File:Isp_reset.png]] | |||
Connect the wires between the Arduino UNO and the RPICT board as follow: | |||
Arduino RPICT | |||
10 Rst | |||
Gnd Gnd | |||
11 MOSI | |||
12 MISO | |||
13 SCK | |||
5V Vcc | |||
Revision as of 19:19, 23 February 2019
This will guide through the steps to flash the firmware on the attiny84 microcontroller found on some RPICT series.
Required equipment
- 1 Arduino UNO
- 6 Jumper wires
Connections
Connect the wires between the Arduino UNO and the RPICT board as follow:
Arduino RPICT 10 Rst Gnd Gnd 11 MOSI 12 MISO 13 SCK 5V Vcc
