Flash RPICT Attiny84 with Arduino UNO: Difference between revisions
Jump to navigation
Jump to search
No edit summary |
|||
| Line 39: | Line 39: | ||
|- | |- | ||
|} | |} | ||
=ISP Sketch= | |||
Open the Arduino IDE and open the file | |||
'''Files''' | '''Examples''' | '''ArduinoISP''' | |||
Upload it to the Arduino uno. Make sure that '''Tools''' | '''Board: Arduino/Genuino UNO''' is selected. | |||
=Upload the Attiny sketch= | |||
Download the sketch that you wish to upload. Open it with the Arduino IDE. | |||
Select '''Tools''' | '''Board: ATtiny 24/44/84''' | |||
Then select '''Tools''' | '''Burn Bootloader''' | |||
Revision as of 19:28, 23 February 2019
This will guide through the steps to flash the firmware on the attiny84 microcontroller found on some RPICT series.
Required equipment
- 1 Arduino UNO
- 6 Jumper wires
Connections
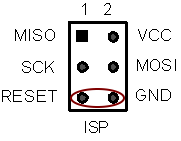
Connect the wires between the Arduino UNO and the RPICT board as follow:
| Arduino | RPICT |
|---|---|
| 10 | Rst |
| Gnd | Gnd |
| 13 | SCK |
| 11 | MOSI |
| 12 | MISO |
| 5V | VCC |
ISP Sketch
Open the Arduino IDE and open the file Files | Examples | ArduinoISP
Upload it to the Arduino uno. Make sure that Tools | Board: Arduino/Genuino UNO is selected.
Upload the Attiny sketch
Download the sketch that you wish to upload. Open it with the Arduino IDE.
Select Tools | Board: ATtiny 24/44/84
Then select Tools | Burn Bootloader
