Flash RPICT Attiny84 with Arduino UNO: Difference between revisions
Jump to navigation
Jump to search
| Line 20: | Line 20: | ||
13 SCK<br> | 13 SCK<br> | ||
5V Vcc<br> | 5V Vcc<br> | ||
{| class="wikitable" | |||
|+ | |||
|- | |||
!Arduino | |||
!RPICT | |||
|- | |||
| '''SCT-019-000''' | |||
| 200 | |||
|- | |||
| 24 | |||
| 83.33 | |||
|- | |||
| 60 | |||
| 39 | |||
|- | |||
| 50 | |||
| 47 | |||
|- | |||
| 30 | |||
| 75 | |||
|- | |||
| 25 | |||
| 91 | |||
|- | |||
| 20 | |||
| 120 | |||
|- | |||
| 47 | |||
| 17.02 | |||
|- | |||
|} | |||
Revision as of 19:20, 23 February 2019
This will guide through the steps to flash the firmware on the attiny84 microcontroller found on some RPICT series.
Required equipment
- 1 Arduino UNO
- 6 Jumper wires
Connections
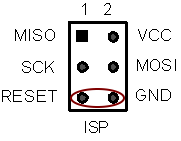
Connect the wires between the Arduino UNO and the RPICT board as follow:
Arduino RPICT
10 Rst
Gnd Gnd
11 MOSI
12 MISO
13 SCK
5V Vcc
| Arduino | RPICT |
|---|---|
| SCT-019-000 | 200 |
| 24 | 83.33 |
| 60 | 39 |
| 50 | 47 |
| 30 | 75 |
| 25 | 91 |
| 20 | 120 |
| 47 | 17.02 |
