Howto setup Raspbian for serial read
VIEW THE NEW DOCUMENTATION INSTEAD HERE
This howto will cover the steps to setup a Rasperrypi for reading CSV stream from RPICT series board.
Hardware and OS
This applies to all Raspberrypi. If using the image from Emoncms (emonpi) then this setup is not needed.
Latest tested OS for this guide:
Raspberrypi OS Released: 2023-12-05
Both for Lite and Desktop variants.
Steps
-1-
The Raspberry pi OS must be installed and running.
To get a Raspberry Pi Os image you can either
Download the image from the raspberrypi website.
https://www.raspberrypi.org/software/operating-systems/
or
Make an image yourself using the Imager.
https://www.raspberrypi.com/software/
If you are running headless with the 'Raspberry Pi OS Lite' you will have to connect a keyboard and monitor for the very first time the raspberry is run. This is to allow access to the first time boot wizard. Also creating an empty 'ssh' file inside the /boot directory will be useful for connecting via ssh. Alternatively you can just use the imager software from above to setup username and ssh before flashing.
-2-
For what follow you must open a terminal window.
On the desktop version of Raspberry Pi OS just open a terminal.
On the headless version connect to the raspberry via ssh with the user/password you created.
-3-
Run the raspi-config tool
$ sudo raspi-config
Then disable the login uart
3 Interface Options
I6 Serial Port <<-- might also be found as I5 Serial Port
Would you like a login shell to be accessible over serial?
Select No to the login shell question.
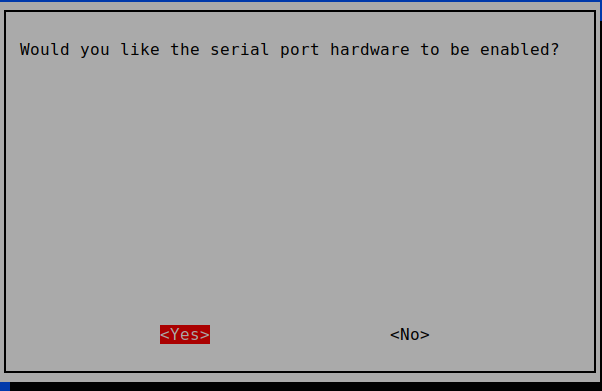
Would you like the serial port hardware to be enabled?
Select Yes to the serial port hardware to be enabled question.
Select Ok at the summary.
Back at the menu select finish.
Would you like to reboot now?
Select No to the reboot question (we will do that later).
-4-
Edit the /boot/config.txt file
$ sudo nano /boot/config.txt
At the end of the file add the following line:
dtoverlay=disable-bt
Enter the line exactly as it is show above without adding whitespaces.
Save and Exit file.
(note the above will disable bluetooth - if bluetooth is needed do not execute this step and use ttyS0 instead of ttyAMA0 for what follows).
[alternative] A one liner to include the above line in the config file would be
sudo bash -c 'echo "dtoverlay=disable-bt" >> /boot/config.txt'
For Raspberrypi 5 only also add the line below
dtoverlay=uart0
-5-
[OPTIONAL]
Disable hciuart
sudo systemctl disable hciuart
-6-
Reboot
sudo reboot & exit
return to the ssh session again once the raspberrypi is up and running again.
-7-
It might be useful to get the board with all utilities ready at this point. Just issue the commands below to install them:
Install python3-serial
sudo apt-get install python3-serial
Get the rpict package:
wget lechacal.com/RPICT/tools/lcl-rpict-package_latest.deb
Install it with
sudo dpkg -i lcl-rpict-package_latest.deb
-8-
Last step is testing the serial port.
/!\ DO NOT SKIP THIS TEST /!\
This is the most basic test to confirm you are able to read from the serial port. If it fails do not continue your setup. Instead carefully review the configuration setup described above.
If you encounter issues with your own application or some custom configuration then do run this test again to make sure the serial port is still operational.
Insert the RPICT board on the RPI. Configure and read from serial port
stty -echo -F /dev/ttyAMA0 raw speed 38400
cat /dev/ttyAMA0
Note these two command above can be run directly using
lcl-run
At that point the data will be shown on the terminal. This is an example with the RPICT3T1 below.

Please refer to the dedicated page of the board for the details of each field.


