RPICT8 Version 5: Difference between revisions
| (18 intermediate revisions by the same user not shown) | |||
| Line 1: | Line 1: | ||
RPICT8 Master Version 5 | |||
[[File:IMG_0425_small.png | right | 300px]] | [[File:IMG_0425_small.png | right | 300px]] | ||
[http://lechacalshop.com/gb/internetofthing/85-rpict8version5.html | [[File:Link_to_the_shop.png | link=http://lechacalshop.com/gb/internetofthing/85-rpict8version5.html ]] | ||
This page is for board specific information. More information can be found on the [[Raspberrypi_Current_and_Temperature_Sensor_Adaptor | generic page for RPICT series]]. | This page is for board specific information. More information can be found on the [[Raspberrypi_Current_and_Temperature_Sensor_Adaptor | generic page for RPICT series]]. | ||
* 8 AC current sensors. | * 8 AC current sensors. | ||
* Compute | * Compute Irms and Estimated Power. | ||
* Fit on Raspberrypi 4 holes mounting pattern. | * Fit on Raspberrypi 4 holes mounting pattern. | ||
* AtMega328 Mcu (Arduino UNO) | * AtMega328 Mcu (Arduino UNO) | ||
| Line 23: | Line 23: | ||
|Raspberrypi 1 A | |Raspberrypi 1 A | ||
|No | |No | ||
|- | |||
|Raspberrypi 1 B | |||
|No mounting holes. | |||
|- | |- | ||
|Raspberrypi 1 B+ | |Raspberrypi 1 B+ | ||
| Line 34: | Line 37: | ||
|- | |- | ||
|Raspberrypi 3 B+ | |Raspberrypi 3 B+ | ||
|Yes | |Yes | ||
|- | |- | ||
|Raspberrypi 4 B | |Raspberrypi 4 B | ||
|Yes | |||
|- | |||
|Raspberrypi 5 | |||
|Yes | |Yes | ||
|- | |- | ||
|} | |} | ||
* Asus Tinkerboard has been reported to work with RPICT units. Note we wont be able to provide support for the Tinkerboard. | |||
'''OrangePi'''. There is an ongoing project to port RPICT8 to Orange Pi. This will under the naming of OPICT8 since the mechanical design must be different. Preliminary setup is shown [[OrangePi_Setup | here]]. Get in touch with us if you are interested in OPICT8. | |||
=Recommended sensors= | =Recommended sensors= | ||
| Line 49: | Line 56: | ||
* SCT-006 | * SCT-006 | ||
* SCT-019 | * SCT-019 | ||
* SCT-024 400A/100mA | |||
* SCT-031 600A/100mA | |||
Only current output CT are supported. | Only current output CT are supported. | ||
| Line 61: | Line 70: | ||
=Software Configuration= | =Software Configuration= | ||
===Legacy firmware=== | |||
For any units ordered before the 1st of July 2022 the firmware version is version 3. Follow this link below for configuration. If possible upgrade to firmware version 4.<br> | |||
[[Before 1st July 22 RPICT8 Configuration]]<br> | |||
[[Upgrading to sketch version 4]] | |||
===Configuration via web interface=== | |||
First make sure the lcl-package is installed if not done already. | |||
- | wget lechacal.com/RPICT/tools/lcl-rpict-package_latest.deb | ||
- | sudo dpkg -i lcl-rpict-package_latest.deb | ||
Now starts a server instance on the Raspberrypi using. | |||
lcl-server.sh | |||
You can now access the Raspberrypi configuration server if you point your browser to the link below | |||
http://raspberrypi:8000/ | |||
You can now edit the configuration. | |||
[[File:Screenshot_2021-11-01_20-22-56.png | 450px | link=http://lechacal.com/RPICT/config/generator/latest/index.html]] | |||
An online version of this web interface exists on this link below. | |||
http://lechacal.com/RPICT/config/generator/latest/index.html | |||
===Configuration via command line=== | |||
The documentation for serial configuration can be found on this page. <br> | |||
[[Over_Serial_Configuration_-_Sketch_4]]<br> | |||
The tool to upload the configuration is called lcl-rpict-config.py. | |||
To read the configuration use | |||
lcl-rpict-config.py -a | |||
This produce the /tmp/rpict.conf file containing the configuration of the device. | |||
One can modify this file and write it back using | |||
lcl-rpict-config.py -a -w /tmp/rpict.conf | |||
=Files= | =Files= | ||
Unit are sold with the sketch below already loaded. | |||
[http://lechacal.com/RPICT/ | [http://lechacal.com/RPICT/sketch/RPICT_MCP3208_v4.1.0.ino Default Sketch V4.1.0.]<br> | ||
[http://lechacal.com/RPICT/sketch/RPICT_MCP3208_v4.2.0.ino Default Sketch V4.2.0.]<br> | |||
[ | |||
If needed this sketch can be loaded directly from the Raspberrypi following [[Upload_Arduino_sketch_from_Raspberrypi_to_RPICT | this guide]] and executing the commands below. | |||
wget lechacal.com/RPICT/sketch/RPICT_MCP3208_v4.2.0.ino.hex | |||
lcl-upload-sketch.sh RPICT_MCP3208_v4.2.0.ino.hex | |||
=Default Data Output= | =Default Data Output= | ||
| Line 145: | Line 172: | ||
First of all make sure you have python-serial package installed | First of all make sure you have python-serial package installed | ||
$ sudo apt-get install | $ sudo apt-get install python3-serial | ||
Then copy the following into an executable file and run it. | Then copy the following into an executable file and run it. | ||
<syntaxhighlight lang="python"> | <syntaxhighlight lang="python"> | ||
#!/usr/bin/ | #!/usr/bin/python3 | ||
import serial | import serial | ||
ser = serial.Serial('/dev/ttyAMA0', 38400) | ser = serial.Serial('/dev/ttyAMA0', 38400) | ||
| Line 156: | Line 183: | ||
while 1: | while 1: | ||
# Read one line from the serial buffer | # Read one line from the serial buffer | ||
line = ser.readline() | line = ser.readline().decode().strip() | ||
# Create an array of the data | # Create an array of the data | ||
Z = line.split(' ') | Z = line.split(' ') | ||
| Line 168: | Line 192: | ||
for i in range(len(Z)): | for i in range(len(Z)): | ||
if i==0: | if i==0: | ||
print ("NodeID: %s" % Z[0]) | print("NodeID: %s" % Z[0]) | ||
else: | else: | ||
print ("Power %d: %s W" % (i, Z[i])) | print("Power %d: %s W" % (i, Z[i])) | ||
except KeyboardInterrupt: | except KeyboardInterrupt: | ||
ser.close() | ser.close() | ||
</syntaxhighlight> | </syntaxhighlight> | ||
=Enclosure= | =Enclosure= | ||
Latest revision as of 12:49, 11 November 2023
RPICT8 Master Version 5


This page is for board specific information. More information can be found on the generic page for RPICT series.
- 8 AC current sensors.
- Compute Irms and Estimated Power.
- Fit on Raspberrypi 4 holes mounting pattern.
- AtMega328 Mcu (Arduino UNO)
- MCP3208 12bit ADC
- Stackable with RPICT8 Slave
Compatibility
| Version | Compatible? |
|---|---|
| Raspberrypi 1 A | No |
| Raspberrypi 1 B | No mounting holes. |
| Raspberrypi 1 B+ | Yes |
| Raspberrypi 2 B | Yes |
| Raspberrypi 3 B | Yes |
| Raspberrypi 3 B+ | Yes |
| Raspberrypi 4 B | Yes |
| Raspberrypi 5 | Yes |
- Asus Tinkerboard has been reported to work with RPICT units. Note we wont be able to provide support for the Tinkerboard.
OrangePi. There is an ongoing project to port RPICT8 to Orange Pi. This will under the naming of OPICT8 since the mechanical design must be different. Preliminary setup is shown here. Get in touch with us if you are interested in OPICT8.
Recommended sensors
AC Current sensor
- SCT-013-000
- SCT-006
- SCT-019
- SCT-024 400A/100mA
- SCT-031 600A/100mA
Only current output CT are supported.

Stacking Configuration
General stacking information is described in the RPICT stacking page.
Software Configuration
Legacy firmware
For any units ordered before the 1st of July 2022 the firmware version is version 3. Follow this link below for configuration. If possible upgrade to firmware version 4.
Before 1st July 22 RPICT8 Configuration
Upgrading to sketch version 4
Configuration via web interface
First make sure the lcl-package is installed if not done already.
wget lechacal.com/RPICT/tools/lcl-rpict-package_latest.deb
sudo dpkg -i lcl-rpict-package_latest.deb
Now starts a server instance on the Raspberrypi using.
lcl-server.sh
You can now access the Raspberrypi configuration server if you point your browser to the link below
http://raspberrypi:8000/
You can now edit the configuration.
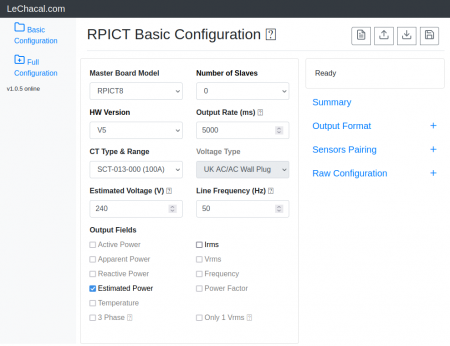
An online version of this web interface exists on this link below.
http://lechacal.com/RPICT/config/generator/latest/index.html
Configuration via command line
The documentation for serial configuration can be found on this page.
Over_Serial_Configuration_-_Sketch_4
The tool to upload the configuration is called lcl-rpict-config.py. To read the configuration use
lcl-rpict-config.py -a
This produce the /tmp/rpict.conf file containing the configuration of the device.
One can modify this file and write it back using
lcl-rpict-config.py -a -w /tmp/rpict.conf
Files
Unit are sold with the sketch below already loaded.
If needed this sketch can be loaded directly from the Raspberrypi following this guide and executing the commands below.
wget lechacal.com/RPICT/sketch/RPICT_MCP3208_v4.2.0.ino.hex
lcl-upload-sketch.sh RPICT_MCP3208_v4.2.0.ino.hex
Default Data Output
Using the manufacture firmware the data output is:
NodeID P1 P2 P3 P4 P4 P5 P6 P7 P8
P1 being the estimated Power using CT1. `Estimated Power` computes power multiplying Irms by Vest. Where Vest is the estimated Voltage setup in the config. By default Vest=240V we recommend to change this to 220V or 110V if your local voltage supply differ.
Other output type can be streamed out. This should be configured in the unit.
All outputs type available are
- Estimated Power (W)
- Irms (A)
If stacked with another unit that include a voltage port the following outputs can also be added:
- Real Power (W)
- Apparent Power (W)
- Power Factor
- Vrms (V)
Restore Default Config
You should have received a key when acquiring the unit. Use this key to download and restore the default configuration.
If the key was XXXX then execute these commands below. Replace XXXX with your own key.
$ wget lechacal.com/hardware/c/XXXX.conf
$ lcl-rpict-config.py -w XXXX.conf
Emoncms Config (Emonhub)
Make you read this first.
For default configuration.
 [[11]]
   nodename = RPICT8
   hardware = RPICT8
   [[[rx]]]
       names = Power1, Power2, Power3, Power4, Power5, Power6, Power7, Power8
       datacode = 0
       scales = 1,1,1,1,1,1,1,1
       units = W,W,W,W,W,W,W,W
Python demo script
First of all make sure you have python-serial package installed
$ sudo apt-get install python3-serial
Then copy the following into an executable file and run it.
 #!/usr/bin/python3
 import serial
 ser = serial.Serial('/dev/ttyAMA0', 38400)

 try:
        while 1:
             # Read one line from the serial buffer
             line = ser.readline().decode().strip()

             # Create an array of the data
             Z = line.split(' ')

             # Print it nicely
             print ("----------")
             for i in range(len(Z)):
                 if i==0:
                     print("NodeID: %s" % Z[0])
                 else:
                     print("Power %d: %s W" % (i, Z[i]))

 except KeyboardInterrupt:
        ser.close()
Enclosure
Enclosures kit are available as a 3D printed product. Link to the shop.
Both Raspberrypi 3 and 4 format are available.

Related Pages
Howto setup Raspbian for serial read