Standalone Arduino Programmer: Difference between revisions
No edit summary |
No edit summary |
||
| (25 intermediate revisions by the same user not shown) | |||
| Line 1: | Line 1: | ||
[[File:P1000441.JPG_small.png|360px]] | |||
=Overview= | |||
= | [[File:Link_to_the_shop.png | link=https://lechacalshop.com/gb/misc/116-standalone-arduino-programmer-mega-shield.html]] | ||
The standalone Arduino Programmer can | The standalone Arduino Programmer can program many atmel chip in stand alone mode which means it does not need a computer to operate. | ||
This is very useful for automating the programming of large number of chips. | This is very useful for automating the programming of large number of chips. | ||
This product is a shield for the Arduino Mega. | |||
You will need to program the Arduino Mega only once with a computer then the programmer will be stand-alone and only need connection with a power source. | |||
[[File:P1000463.JPG small.png|360px]] | |||
The principle is: | |||
* Program the Arduino Mega with the sketch provided below. | |||
* Flash the target sketch on a SD card | |||
* Insert the SD card / Connect the mega to the power supply. | |||
* Connect the shield to the target device with the 6 pin cable. | |||
* Press OK on the shield. | |||
* Target is now programmed. | |||
=Features= | =Features= | ||
| Line 16: | Line 31: | ||
* Provision for use of a small LCD screen. | * Provision for use of a small LCD screen. | ||
= | =Usage= | ||
==Preparing the programmer== | ==Preparing the programmer== | ||
* Compile the target sketch on Arduino IDE. | * Compile the target sketch on Arduino IDE. | ||
* Locate the produced hex file. | * Locate the produced hex file. | ||
* Copy it to the SD card. | * Copy it to the SD card. | ||
* Rename the file as 'firmware | * Rename the file as 'firmware.hex'. | ||
* Insert the SD card in the programmer. | * Insert the SD card in the programmer. | ||
[[File:P1000461.JPG small.png|360px]] | |||
==Production Usage== | ==Production Usage== | ||
| Line 28: | Line 45: | ||
* Press the OK button. | * Press the OK button. | ||
* Sucessful flash will be indicated with the green led 'ok' | * Sucessful flash will be indicated with the green led 'ok' | ||
=Firmware= | |||
Several firmwares that can be used on the programmer. | |||
==Atmega_Hex_Uploader_Fixed_Filename firmware== | |||
This is the basic firmware. It allows programming with the buttons and confirmation is indicated with leds.<br> | |||
Download the firmware from this github repo:. | |||
https://github.com/nickgammon/arduino_sketches | |||
Choose the sketch named '''Atmega_Hex_Uploader_Fixed_Filename''' | |||
A special version of SDFat library is needed. Download it from here below. Do not use the latest version of this library or compilation will fail. | |||
https://github.com/greiman/SdFat/releases/tag/1.1.4 | |||
* Install the above library. | |||
* Open the '''Atmega_Hex_Uploader_Fixed_Filename''' sketch in the Arduino IDE. | |||
* Select '''Tools''' -> '''Board:''' -> '''Arduino AVR Boards''' -> '''Arduino Mega or Mega 2560''' | |||
* Connect the Mega to the usb port. | |||
* Click on Upload to write the programming sketch. | |||
===Usage=== | |||
Only the OK button is functional. Press OK to start flashing the target. | |||
A sucessful flash will be indicated by the green LED blinking. | |||
Errors will be reported using the patterns below | |||
'''Problems with SD card or programming target chip''' | |||
Red x 1 = Cannot open SD card | |||
Red x 2 = Cannot read file 'firmware.hex' | |||
Red x 3 = Cannot enter programming mode in target chip | |||
Red x 4 = This chip does not have a bootloader fuse | |||
Red x 5 = Cannot read chip signature | |||
Red x 6 = Unrecognised signature | |||
Red x 7 = Bad start address in hex file for code | |||
Red x 8 = Verification error | |||
'''Problems with firmware.hex file''' | |||
Red+yellow x 1 = Line in file is too long | |||
Red+yellow x 2 = Line in file is too short | |||
Red+yellow x 3 = Line does not start with a colon (:) | |||
Red+yellow x 4 = Invalid hex digits (should be 0-9, A-F) | |||
Red+yellow x 5 = Bad sumcheck at end of line | |||
Red+yellow x 6 = Line not expected length | |||
Red+yellow x 7 = Unknown record type | |||
Red+yellow x 8 = No 'end of file' record in file | |||
Red+yellow x 9 = File will not fit into flash of target | |||
Credits to the author of this firmware who documented the usage [http://www.gammon.com.au/forum/?id=11638&reply=5#reply5 here]. | |||
Latest revision as of 14:56, 9 October 2023
Overview
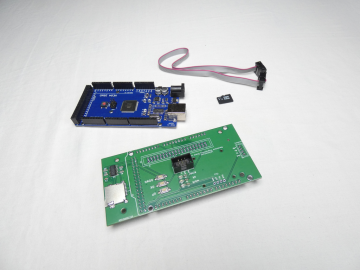
The standalone Arduino Programmer can program many atmel chip in stand alone mode which means it does not need a computer to operate. This is very useful for automating the programming of large number of chips.
This product is a shield for the Arduino Mega.
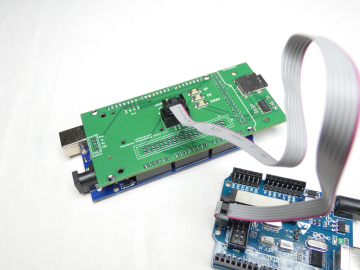
You will need to program the Arduino Mega only once with a computer then the programmer will be stand-alone and only need connection with a power source.
The principle is:
- Program the Arduino Mega with the sketch provided below.
- Flash the target sketch on a SD card
- Insert the SD card / Connect the mega to the power supply.
- Connect the shield to the target device with the 6 pin cable.
- Press OK on the shield.
- Target is now programmed.
Features
- Onboard Micro SD card.
- 3 operation LED (work / ok / error).
- 3 operation button.
- 6 pin SPI connection to target.
- Additional GPIO pins available for expansion.
- Provision for use of a small LCD screen.
Usage
Preparing the programmer
- Compile the target sketch on Arduino IDE.
- Locate the produced hex file.
- Copy it to the SD card.
- Rename the file as 'firmware.hex'.
- Insert the SD card in the programmer.
Production Usage
- Connect the 6 pin ribbon cable to the target device.
- Press the OK button.
- Sucessful flash will be indicated with the green led 'ok'
Firmware
Several firmwares that can be used on the programmer.
Atmega_Hex_Uploader_Fixed_Filename firmware
This is the basic firmware. It allows programming with the buttons and confirmation is indicated with leds.
Download the firmware from this github repo:.
https://github.com/nickgammon/arduino_sketches
Choose the sketch named Atmega_Hex_Uploader_Fixed_Filename
A special version of SDFat library is needed. Download it from here below. Do not use the latest version of this library or compilation will fail.
https://github.com/greiman/SdFat/releases/tag/1.1.4
- Install the above library.
- Open the Atmega_Hex_Uploader_Fixed_Filename sketch in the Arduino IDE.
- Select Tools -> Board: -> Arduino AVR Boards -> Arduino Mega or Mega 2560
- Connect the Mega to the usb port.
- Click on Upload to write the programming sketch.
Usage
Only the OK button is functional. Press OK to start flashing the target. A sucessful flash will be indicated by the green LED blinking. Errors will be reported using the patterns below
Problems with SD card or programming target chip
   Red x 1 = Cannot open SD card
   Red x 2 = Cannot read file 'firmware.hex'
   Red x 3 = Cannot enter programming mode in target chip
   Red x 4 = This chip does not have a bootloader fuse
   Red x 5 = Cannot read chip signature
   Red x 6 = Unrecognised signature
   Red x 7 = Bad start address in hex file for code
   Red x 8 = Verification error
Problems with firmware.hex file
   Red+yellow x 1 = Line in file is too long
   Red+yellow x 2 = Line in file is too short
   Red+yellow x 3 = Line does not start with a colon (:)
   Red+yellow x 4 = Invalid hex digits (should be 0-9, A-F)
   Red+yellow x 5 = Bad sumcheck at end of line
   Red+yellow x 6 = Line not expected length
   Red+yellow x 7 = Unknown record type
   Red+yellow x 8 = No 'end of file' record in file
   Red+yellow x 9 = File will not fit into flash of target
Credits to the author of this firmware who documented the usage here.


