Upgrading to sketch version 4: Difference between revisions
No edit summary |
No edit summary |
||
| Line 3: | Line 3: | ||
There is now a new release of the default factory sketch. This is version 4.0.0. | There is now a new release of the default factory sketch. This is version 4.0.0. | ||
Current | Current products are still being sold with the previous 3.2.0 version therefore you should manually install this one if you want to upgrade. | ||
This is for all units RPICT8 RPICT7V1 RPICT4V3 RPIZ_CT4V3T2 all in version 3 4 and 5. | This is for all units RPICT8 RPICT7V1 RPICT4V3 RPIZ_CT4V3T2 all in version 3 4 and 5. | ||
| Line 13: | Line 13: | ||
Version 4 has been through a complete review and allow for multiple type of computation nodes within the same RPICT unit. | Version 4 has been through a complete review and allow for multiple type of computation nodes within the same RPICT unit. | ||
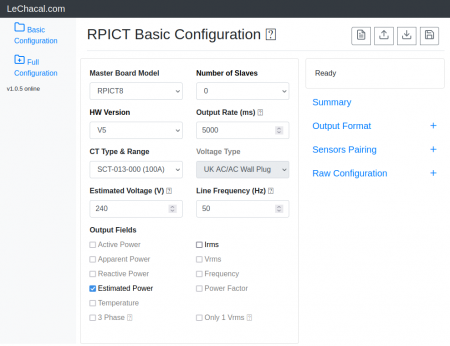
The major improvement is the support of a new web interface. This is still under development and for now only support a basic configuration. | The major improvement is the support of a new web interface. This is still under development and for now only have support for a basic configuration. | ||
Future versions will have a more advanced configuration panel with full control of node configuration. | |||
[[File:Screenshot_2021-11-01_20-22-56.png | 450px]] | [[File:Screenshot_2021-11-01_20-22-56.png | 450px]] | ||
Revision as of 20:46, 1 November 2021
There is now a new release of the default factory sketch. This is version 4.0.0.
Current products are still being sold with the previous 3.2.0 version therefore you should manually install this one if you want to upgrade.
This is for all units RPICT8 RPICT7V1 RPICT4V3 RPIZ_CT4V3T2 all in version 3 4 and 5.
RPICT3T1 and RPICT3V1 and equivalent for raspberrypi zero are not concerned by this upgrade.
What's new?
Version 4 has been through a complete review and allow for multiple type of computation nodes within the same RPICT unit.
The major improvement is the support of a new web interface. This is still under development and for now only have support for a basic configuration.
Future versions will have a more advanced configuration panel with full control of node configuration.
Installation
Sketch
Install avrdude on the Raspberrypi. For this just follow the steps in the guide below.
Upload Arduino sketch from Raspberrypi to RPICT
Download the new frimware. For version 3:
wget lechacal.com/RPICT/sketch/RPICT_MCP3208_V3_v4.0.0.ino
For version 4 and 5:
wget lechacal.com/RPICT/sketch/RPICT_MCP3208_v4.0.0.ino
Then upload the firmware to the RPICT unit using
lcl-upload-sketch.sh RPICT_MCP3208_v4.0.0.ino
Lcl-rpict Package
We have packed together the web interface with all the tools required in a single package.
Get the package:
wget lechacal.com/RPICT/tools/lcl-rpict-package_v1.0.0.deb
Install it with
sudo dkpg -i lcl-rpict-package_v1.0.0.deb
Run the server
To run the server just launch the command below
lcl-server.sh
You can now access the web interface from any computer/device on your network with the address
http://raspberrypi:8000
or
http://<ip-address>:8000
From there it is possible to configure the RPICT unit directly from the web interface without going through the lcl-rpict-config.py command.
Run the server at boot time
If you prefer having the server running all the time without entering the lcl-server.sh command then follow the steps below.
sudo systemctl start lcl-server
sudo systemctl enable lcl-server
