RPICT7V1 Version 4: Difference between revisions
(Created page with "File:IMG_1892_small.png") |
No edit summary |
||
| Line 1: | Line 1: | ||
[[File:IMG_1892_small.png]] | [[File:IMG_1892_small.png | right | 400px]] | ||
RPICT7V1 (This covers for hardware versions 4) | |||
[http://lechacalshop.com/gb/internetofthing/65-rpict7v1version4.html Link to shop] | |||
This page is for board specific information. More information can be found on the [[Raspberrypi_Current_and_Temperature_Sensor_Adaptor | generic page for RPICT series]]. | |||
[[File: IMG_1128_small.png | right| 400px]] | |||
* 7 AC current sensors. | |||
* 1 AC Voltage sensor. | |||
* Measure RMS Current and Voltage, Active power, Apparent Power, Power Factor. | |||
* Fit on Raspberrypi 4 holes mounting pattern. | |||
* AtMega328 Mcu (Arduino UNO) | |||
* MCP3208 ADC | |||
* Stackable with itself, RPICT8 and RPICT4V3. | |||
=Compatibility= | |||
{| class="wikitable" | |||
|+ | |||
|- | |||
!Version | |||
!Compatible? | |||
|- | |||
|Raspberrypi 1 A | |||
|No | |||
|- | |||
|Raspberrypi 1 B+ | |||
|Yes | |||
|- | |||
|Raspberrypi 2 B | |||
|Yes | |||
|- | |||
|Raspberrypi 3 B | |||
|Yes | |||
|- | |||
|Raspberrypi 3 B+ | |||
|Yes | |||
|- | |||
|} | |||
==Recommended sensors== | |||
[[File:IMG_1125_small.png | right | 300px]] | |||
* AC Current sensor: | |||
** SCT-013-000 | |||
** SCT-019 | |||
** SCT-006 | |||
* AC Voltage sensor: | |||
** UK: 77DB-06-09 | |||
** EU: 77DE-06-09 | |||
** US: 77DA-10-09 | |||
VOLTAGE OUTPUT CT ARE NOT COMPATIBLE WITH THIS BOARD. | |||
==Stacking Configuration== | |||
[[File: IMG_0980_small.png | right | 300px]] | |||
General stacking information is described in the RPICT stacking page. | |||
[[RPICT_Stacking]] | |||
==Software Configuration== | |||
Using a serial line terminal program one can configure the following: | |||
- Polling interval | |||
- Output format (csv or emonhub) | |||
- Calibration values (Voltage and Current) | |||
- Voltage/current combinations for real power computation. | |||
- Output channels | |||
The documentation for serial configuration can be found on this page. <br> | |||
[[Over Serial Configuration - Sketch 2.2]]<br> | |||
[[Over Serial Configuration - Sketch 2.3]]<br> | |||
[[Over Serial Configuration - Sketch 2.4]]<br> | |||
[[Over Serial Configuration - Sketch 2.5]]<br> | |||
[[Over Serial Configuration - Sketch 2.6]]<br> | |||
[[Over Serial Configuration - Sketch 2.8]]<br> | |||
[[Over Serial Configuration - Sketch 3.0]]<br> | |||
[[File:Online_config_01.png | 300px| link=http://lechacal.com/RPICT/config/generator/v3.0/]] The board can be configured with the [http://lechacal.com/RPICT/config/generator/v3.0/ online configurator]. | |||
==Files== | |||
===Default Sketch=== | |||
[http://lechacal.com/RPICT/7CT1V/RPICT7V1_v2_5.ino Default Sketch V2.5.]<br> | |||
[http://lechacal.com/RPICT/7CT1V/RPICT7V1_v2_6_3.ino Default Sketch V2.6.]<br> | |||
[http://lechacal.com/RPICT/7CT1V/RPICT7V1_v2_7_1.ino Default Sketch V2.7.1.]<br> | |||
[http://lechacal.com/RPICT/7CT1V/RPICT7V1_v2_8_0.ino Default Sketch V2.8.0.]<br> | |||
[http://lechacal.com/RPICT/7CT1V/RPICT_MCP3208_v3_0_0.ino Default Sketch V3.0.0.]<br> | |||
[http://lechacal.com/RPICT/7CT1V/RPICT_MCP3208_v3.0.1.ino Default Sketch V3.0.1.]<br> | |||
===noOSC Sketch=== | |||
The Default sketch allows up to 28 computation nodes to be run. If more are needed for higher stacks then we recommend to use the noOSC sketch. This is the same as the default sketch but Over Serial Configuration (OSC) as been removed to allow up to 40 nodes to be computed. Configuration has to be edited in the sketch. | |||
[http://lechacal.com/RPICT/7CT1V/RPICT_noOSC_v1_0.ino noOSC Sketch v1.0]<br> | |||
[http://lechacal.com/RPICT/7CT1V/RPICT_noOSC_v1_1.ino noOSC Sketch v1.1]<br> | |||
==Emoncms Config (Emonhub)== | |||
Make sure you read [[Raspberrypi_Current_and_Temperature_Sensor_Adaptor#Using_Emoncms | this]] first. | |||
For default configuration. Used as single board only (not stacked). | |||
<nowiki>[[11]]</nowiki> | |||
nodename = my_RPICT7V1 | |||
hardware = RPICT7V1 | |||
[[[rx]]] | |||
names = RP1, RP2, RP3, RP4, RP5, RP6, RP7, Irms1, Irms2, Irms3, Irms4, Irms5, Irms6, Irms7, Vrms | |||
datacode = 0 | |||
scales = 1,1,1,1,1,1,1,1,1,1,1,1,1,1,1 | |||
units =W,W,W,W,W,W,W,mA,mA,mA,mA,mA,mA,mA,V | |||
[[File:Rpict7v1_channels_001.png]] | |||
==Related Pages== | |||
[[Use Emonhub with RPICT]] | |||
[[Howto setup rpi3 for CSV reading]] | |||
[[How to calibrate the Voltage Port]] | |||
[[Update RPICT firmware (CT7V1/CT4V3/CT8)]] | |||
Revision as of 17:06, 29 March 2019

RPICT7V1 (This covers for hardware versions 4)
This page is for board specific information. More information can be found on the generic page for RPICT series.

- 7 AC current sensors.
- 1 AC Voltage sensor.
- Measure RMS Current and Voltage, Active power, Apparent Power, Power Factor.
- Fit on Raspberrypi 4 holes mounting pattern.
- AtMega328 Mcu (Arduino UNO)
- MCP3208 ADC
- Stackable with itself, RPICT8 and RPICT4V3.
Compatibility
| Version | Compatible? |
|---|---|
| Raspberrypi 1 A | No |
| Raspberrypi 1 B+ | Yes |
| Raspberrypi 2 B | Yes |
| Raspberrypi 3 B | Yes |
| Raspberrypi 3 B+ | Yes |
Recommended sensors

- AC Current sensor:
- SCT-013-000
- SCT-019
- SCT-006
- AC Voltage sensor:
- UK: 77DB-06-09
- EU: 77DE-06-09
- US: 77DA-10-09
VOLTAGE OUTPUT CT ARE NOT COMPATIBLE WITH THIS BOARD.
Stacking Configuration

General stacking information is described in the RPICT stacking page. RPICT_Stacking
Software Configuration
Using a serial line terminal program one can configure the following:
- Polling interval
- Output format (csv or emonhub)
- Calibration values (Voltage and Current)
- Voltage/current combinations for real power computation.
- Output channels
The documentation for serial configuration can be found on this page.
Over Serial Configuration - Sketch 2.2
Over Serial Configuration - Sketch 2.3
Over Serial Configuration - Sketch 2.4
Over Serial Configuration - Sketch 2.5
Over Serial Configuration - Sketch 2.6
Over Serial Configuration - Sketch 2.8
Over Serial Configuration - Sketch 3.0
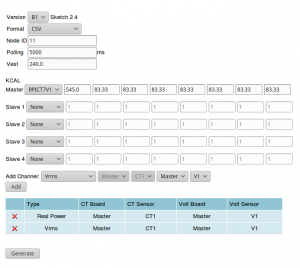 The board can be configured with the online configurator.
Files
Default Sketch
noOSC Sketch
The Default sketch allows up to 28 computation nodes to be run. If more are needed for higher stacks then we recommend to use the noOSC sketch. This is the same as the default sketch but Over Serial Configuration (OSC) as been removed to allow up to 40 nodes to be computed. Configuration has to be edited in the sketch.
noOSC Sketch v1.0
noOSC Sketch v1.1
Emoncms Config (Emonhub)
Make sure you read this first.
For default configuration. Used as single board only (not stacked).
 [[11]]
   nodename = my_RPICT7V1
   hardware = RPICT7V1
   [[[rx]]]
      names = RP1, RP2, RP3, RP4, RP5, RP6, RP7, Irms1, Irms2, Irms3, Irms4, Irms5, Irms6, Irms7, Vrms
      datacode = 0
      scales = 1,1,1,1,1,1,1,1,1,1,1,1,1,1,1
      units =W,W,W,W,W,W,W,mA,mA,mA,mA,mA,mA,mA,V

Related Pages
Howto setup rpi3 for CSV reading