EMONWRT3: Difference between revisions
(→Files) |
|||
| (140 intermediate revisions by the same user not shown) | |||
| Line 1: | Line 1: | ||
[[Image: | [[Image:Emonwrt3_principle_draw_01.png| right]] | ||
=Project Progress= | =Project Progress= | ||
Hardware units are now ready and can be purchased [http://lechacalshop.com/gb/internetofthing/49-emonwrt3ct1v1t1base.html here]. | |||
Software is operational and new features are continuously being added. This has support for Emoncms and Influxdb and Json requests. <br> | |||
Do not hesitate to inform us of the remote service you wish to see included here. | |||
=EmonWRT3 Wifi Energy Monitoring Device with OpenWRT | =EmonWRT3 Wifi Energy Monitoring Device with OpenWRT= | ||
[[Image: IMG_1528_small.png | right | 300px]] | |||
[http://lechacalshop.com/gb/internetofthing/49-emonwrt3ct1v1t1base.html Link to the shop.] | |||
[http://lechacalshop.com/gb/internetofthing/ | |||
EmonWRT3 is a one unit system for energy monitoring. It measures usage of an electrical installation and post data on a server (Emoncms or other). You can then view the data on your computer or phone. | EmonWRT3 is a one unit system for energy monitoring. It measures usage of an electrical installation and post data on a server (Emoncms or other). You can then view the data on your computer or phone. | ||
It combines the Arduino based microcontroller and OpenWRT wifi module together. EmonWRT3 interfaces with sensors like Current Transformers/ Temperature and Voltage. | It combines the Arduino based microcontroller and OpenWRT wifi module together. EmonWRT3 interfaces with sensors like Current Transformers/ Temperature and Voltage. | ||
* Simple to use with web interface for configuration.<br /> | * Simple to use with web interface for configuration.<br /> | ||
* Connect with Wired or Wifi.<br /> | * Connect with Wired or Wifi.<br /> | ||
* Wall mountable.<br /> | * Wall mountable.<br /> | ||
* | * Store and retry send feature. | ||
* Measures AC current and voltage. | |||
* Measures Temperature. | |||
* Computes Vrms, Irms, Real Power, Apparent power, Power Factor. | |||
* Open source components OpenWRT and Arduino. | * Open source components OpenWRT and Arduino. | ||
* Emoncms Influxdb support. | |||
=Data Storage= | |||
==Emoncms== | |||
From the web interface the user can enter the hostname and apikey of the Emoncms account. More than one service can be added if needed. | |||
==Influxdb== | |||
The Influxdb details can be setup in the device web interface. More than one service can be added if needed. | |||
==Json request== | |||
The device can be queried directly to obtain the data locally stored. A simple GET call will return a Json formatted data string. | |||
This is an example of the json call | |||
http://OpenWrt/cgi-bin/emonwrt3-json?last=2 | |||
will return the last 2 samples read as a json array like | |||
[{"timestamp": 1528977907,"Vrms": 246.71,"P1": 1.83,"P2": 16.00,"P3": 4.16,"Temperature": 19.58}, | |||
{"timestamp": 1528977897,"Vrms": 246.82,"P1": 1.42,"P2": 14.44,"P3": 7.36,"Temperature": 19.64}] | |||
=Technical Specifications= | =Technical Specifications= | ||
[[File:IMG_1521_small.png | right | 400px]] | |||
[[File: | |||
* 3 Current Sensor Ports | * 3 Current Sensor Ports | ||
* 1 AC/AC | * 1 AC/AC Voltage Port | ||
* 1 Temperature Sensor Port | * 1 Temperature Sensor Port | ||
| Line 55: | Line 73: | ||
===Defaults=== | ===Defaults=== | ||
IP Address (LAN): 192.168.2.1 | IP Address (Wired LAN): 192.168.2.1<br /> | ||
Username: root<br /> | Username: root<br /> | ||
Password: To be set on first use.<br /> | Password: admin or 'To be set on first use'.<br /> | ||
=Hardware= | =Hardware= | ||
[[File:IMG_1535_small.png | 300px]] | |||
==Base Board== | |||
* [http://lechacalshop.com/gb/internetofthing/49-emonwrt3ct1v1t1base.html Link to the shop]. | |||
[[File:IMG_1488_small.png | 300px]] | |||
This is the key central board which | |||
* host the SKW71 module. | |||
* hosts the sensor ports. | |||
* Embed the Arduino microcontroller. | |||
* Power the system from the micro USB. | |||
* Avail ethernet connection. | |||
This first unit is CT3V1T1 as for 3 CT 1 Voltage and 1 temperature sensors. | |||
==SKW71 Module== | |||
* [http://lechacalshop.com/gb/various/21-skylab-skw71.html Link to the shop] | |||
[[File:Skw71_pic01.jpg | 225px]] | |||
The SKW71 module from Skylab runs the operating system OpenWrt. | |||
* Wifi enabled | |||
* Runs the Emonwrt3 software | |||
* Collect acquired data from Arduino | |||
* Forward to Emoncms/Influxdb/Thingspeak | |||
[[File:S-l300.jpg | right]] | |||
The SKW71 modules has two antenna options. | |||
===PCB Antenna=== | |||
The antenna is internal and does not require any other parts. This usually a good option if other connecting devices are in a good range. | |||
===External Antenna=== | |||
[http://lechacalshop.com/gb/various/51-wifi-antenna-01.html Link to the shop] | |||
If a stronger range is needed this can be a good option. Two additional components will be required. | |||
* 1 U.FL IPX to SMA cable. | |||
* 1 SMA Antenna. | |||
The U.FL IPX connector fits on the SKW71 module. | |||
==Enclosure== | |||
* [http://lechacalshop.com/gb/internetofthing/50-enclosure-kit-for-emonwrt3.html Link to the shop]. | |||
[[Image: IMG_1536_small.png | 300px]] | |||
Enclosure is 3D printed. 60mm square size with 2 wall mount hole. | |||
Two M3 screws hold the assembly together. | |||
Overall dimension 80x60x27mm | |||
=Internal Dataflow= | =Internal Dataflow= | ||
| Line 74: | Line 133: | ||
Internally the Arduino mcu collects data from sensors on the ADC port and transmit them to the OpenWRT module via serial interface. | Internally the Arduino mcu collects data from sensors on the ADC port and transmit them to the OpenWRT module via serial interface. | ||
Then the OpenWRT module transfer all data to the specified web server (Emoncms, InfluxDB etc...) using conventional | Then the OpenWRT module transfer all data to the specified web server (Emoncms, InfluxDB etc...) using conventional HTTP protocols. | ||
The configuration of the unit is using the Luci web interface that comes with OpenWRT. One can | The configuration of the unit is using the Luci web interface that comes with OpenWRT. One can easyly configure the EmonWRT to connect to a wireless network. | ||
=Configuration= | =Configuration= | ||
==The web interface== | |||
All configuration can be done from the luci interface provided by OpenWRT. | |||
===Output Channels=== | |||
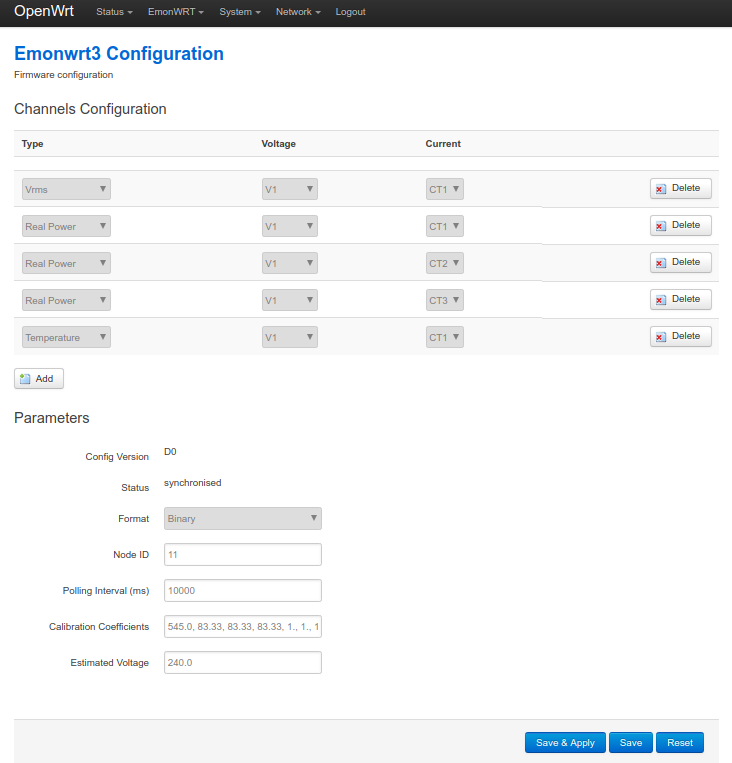
All channels are acquired and computed from the Arduino micro-controller. The configuration of the Arduino device is achieved with the web interface shown below. | |||
NOTICE. When submitting this page you will have to wait at least 30 to 45 seconds. This is due to the microcontroller restarting to write the data to eeprom. | |||
[[Image:Emonwrt3_web_03.png]] | |||
== | ===Stream ouput=== | ||
The | The EmonWRT3 aims to output data to various remote services. Emoncms and Influxdb are supported. This can be configured from the page below: | ||
[[Image:emonwrt3_04.png | 800px]] | |||
===Background Configuration=== | |||
The actual configuration is saved in a text configuration file /etc/config/emonwrt3. | |||
=Mesh Networking= | |||
[[File:Mesh_diag.png | right]] | |||
Using the powerful Operating System OpenWRT the EmonWRT3 supports mesh networking. | |||
Neighbouring units will connect together using ad-hoc wifi to build a network where only one unit may have access to the outer world wide web (or other network). | |||
One Emonwrt3 device will be connected to the network so long as it is in range of at least one other unit already connected to the mesh network. | |||
Follow this guide to enable mesh networking on the EmonWRT3. | |||
[[Mesh networking on OpenWRT 15.05 with OLSR]]. | |||
= | <br clear=all> | ||
=User Manual= | |||
[[First Use]] | |||
[[ | [[Emonwrt3 Web Interface]] | ||
[[ | [[Emonwrt3 Network Configuration]] | ||
[[ | [[Emonwrt3 Upgrade Software]] | ||
[[ | [[Emonwrt3 Advanced Usage]] | ||
=Files= | |||
[[ | [http://lechacal.com/Emonwrt3/EmonWRT3_CT3V1T1_v1.0.ino CT3V1T1 Sketch V1.0]<br /> | ||
[http://lechacal.com/Emonwrt3/EmonWRT3_CT3V1T1_v2.0.ino CT3V1T1 Sketch V2.0]<br /> | |||
[http://lechacal.com/Emonwrt3/EmonWRT3_CT3V1T1_v2.1.ino CT3V1T1 Sketch V2.1]<br /> | |||
[http://lechacal.com/Emonwrt3/EmonWRT3_CT3V1T1_v2.2.ino CT3V1T1 Sketch V2.2]<br /> | |||
=Version History= | =Version History= | ||
==Package== | |||
===v1.1.0=== | |||
* Uses RPICTlib. Must run with sketch 2.1. | |||
===v1.0.3=== | |||
* Changed the way data are recorded on InfluxDB. The name of the influxdb stream is now used as field. Only upgrade is you are ready to accept this formatting change. | |||
===v1.0.2=== | |||
* Adapted code for Raspberrypi build. | |||
===v1.0.1=== | |||
* Added Monitor page to view lastest 5 data records.<br> | |||
* Fixed bug in json output. | |||
===v1.0.0=== | |||
* First version | |||
==Sketch== | ==Sketch== | ||
===1 | ===v2.1=== | ||
* Phasecal now operational. | |||
* Must run with emonwrt3 v1.1.0 software. | |||
=== | ===v2.0=== | ||
* | * Now uses [[RPICTlib]]. | ||
* Note that Phasecal is hard coded to 0. A new version will follow to allow change of phasecal. | |||
* | |||
===v1.0=== | |||
* First version. | |||
Latest revision as of 14:45, 26 April 2020
Project Progress
Hardware units are now ready and can be purchased here.
Software is operational and new features are continuously being added. This has support for Emoncms and Influxdb and Json requests.
Do not hesitate to inform us of the remote service you wish to see included here.
EmonWRT3 Wifi Energy Monitoring Device with OpenWRT
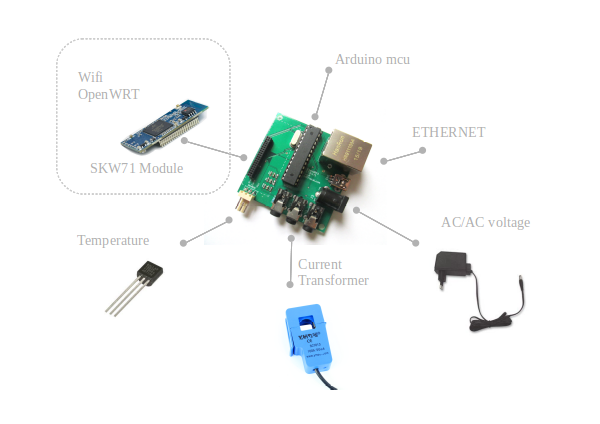
EmonWRT3 is a one unit system for energy monitoring. It measures usage of an electrical installation and post data on a server (Emoncms or other). You can then view the data on your computer or phone.
It combines the Arduino based microcontroller and OpenWRT wifi module together. EmonWRT3 interfaces with sensors like Current Transformers/ Temperature and Voltage.
- Simple to use with web interface for configuration.
- Connect with Wired or Wifi.
- Wall mountable.
- Store and retry send feature.
- Measures AC current and voltage.
- Measures Temperature.
- Computes Vrms, Irms, Real Power, Apparent power, Power Factor.
- Open source components OpenWRT and Arduino.
- Emoncms Influxdb support.
Data Storage
Emoncms
From the web interface the user can enter the hostname and apikey of the Emoncms account. More than one service can be added if needed.
Influxdb
The Influxdb details can be setup in the device web interface. More than one service can be added if needed.
Json request
The device can be queried directly to obtain the data locally stored. A simple GET call will return a Json formatted data string. This is an example of the json call
http://OpenWrt/cgi-bin/emonwrt3-json?last=2
will return the last 2 samples read as a json array like
[{"timestamp": 1528977907,"Vrms": 246.71,"P1": 1.83,"P2": 16.00,"P3": 4.16,"Temperature": 19.58},
{"timestamp": 1528977897,"Vrms": 246.82,"P1": 1.42,"P2": 14.44,"P3": 7.36,"Temperature": 19.64}]
Technical Specifications

- 3 Current Sensor Ports
- 1 AC/AC Voltage Port
- 1 Temperature Sensor Port
- 1 Ethernet Port
- 1 MicroUSB Power Supply port
- Operating System: OpenWRT Chaos Calmer
- Micro Controller Unit: AtMega328 (Arduino)
- Wifi (internal or external antenna)
- PCB Dimensions: 55x55mm
- Enclosure Dimension: 80x60x27mm
Recommended Sensors
Current: SCT-013-000
Temperature: DS18B20
AC/AC Adaptor: 77DB-06-09 77DE-06-09 77DA-10-09
Defaults
IP Address (Wired LAN): 192.168.2.1
Username: root
Password: admin or 'To be set on first use'.
Hardware
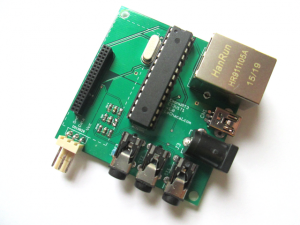
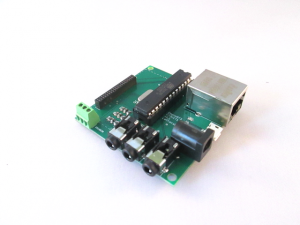
Base Board
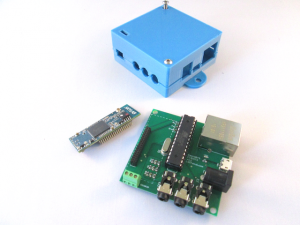
This is the key central board which
- host the SKW71 module.
- hosts the sensor ports.
- Embed the Arduino microcontroller.
- Power the system from the micro USB.
- Avail ethernet connection.
This first unit is CT3V1T1 as for 3 CT 1 Voltage and 1 temperature sensors.
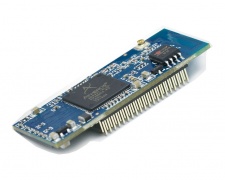
SKW71 Module
The SKW71 module from Skylab runs the operating system OpenWrt.
- Wifi enabled
- Runs the Emonwrt3 software
- Collect acquired data from Arduino
- Forward to Emoncms/Influxdb/Thingspeak

The SKW71 modules has two antenna options.
PCB Antenna
The antenna is internal and does not require any other parts. This usually a good option if other connecting devices are in a good range.
External Antenna
If a stronger range is needed this can be a good option. Two additional components will be required.
- 1 U.FL IPX to SMA cable.
- 1 SMA Antenna.
The U.FL IPX connector fits on the SKW71 module.
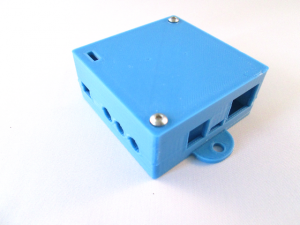
Enclosure
Enclosure is 3D printed. 60mm square size with 2 wall mount hole. Two M3 screws hold the assembly together.
Overall dimension 80x60x27mm
Internal Dataflow
Internally the Arduino mcu collects data from sensors on the ADC port and transmit them to the OpenWRT module via serial interface.
Then the OpenWRT module transfer all data to the specified web server (Emoncms, InfluxDB etc...) using conventional HTTP protocols.
The configuration of the unit is using the Luci web interface that comes with OpenWRT. One can easyly configure the EmonWRT to connect to a wireless network.
Configuration
The web interface
All configuration can be done from the luci interface provided by OpenWRT.
Output Channels
All channels are acquired and computed from the Arduino micro-controller. The configuration of the Arduino device is achieved with the web interface shown below.
NOTICE. When submitting this page you will have to wait at least 30 to 45 seconds. This is due to the microcontroller restarting to write the data to eeprom.
Stream ouput
The EmonWRT3 aims to output data to various remote services. Emoncms and Influxdb are supported. This can be configured from the page below:
Background Configuration
The actual configuration is saved in a text configuration file /etc/config/emonwrt3.
Mesh Networking

Using the powerful Operating System OpenWRT the EmonWRT3 supports mesh networking.
Neighbouring units will connect together using ad-hoc wifi to build a network where only one unit may have access to the outer world wide web (or other network).
One Emonwrt3 device will be connected to the network so long as it is in range of at least one other unit already connected to the mesh network.
Follow this guide to enable mesh networking on the EmonWRT3.
Mesh networking on OpenWRT 15.05 with OLSR.
User Manual
Emonwrt3 Network Configuration
Files
CT3V1T1 Sketch V1.0
CT3V1T1 Sketch V2.0
CT3V1T1 Sketch V2.1
CT3V1T1 Sketch V2.2
Version History
Package
v1.1.0
- Uses RPICTlib. Must run with sketch 2.1.
v1.0.3
- Changed the way data are recorded on InfluxDB. The name of the influxdb stream is now used as field. Only upgrade is you are ready to accept this formatting change.
v1.0.2
- Adapted code for Raspberrypi build.
v1.0.1
- Added Monitor page to view lastest 5 data records.
- Fixed bug in json output.
v1.0.0
- First version
Sketch
v2.1
- Phasecal now operational.
- Must run with emonwrt3 v1.1.0 software.
v2.0
- Now uses RPICTlib.
- Note that Phasecal is hard coded to 0. A new version will follow to allow change of phasecal.
v1.0
- First version.
